發表文章

目前顯示的是 3月, 2020的文章

Apps Script的小程式片斷

返回純文字   return ContentService.createTextOutput('純文字'); 返回純HTML   return HtmlService.createHtmlOutputFromFile("html-name"); 返回沒有帶參數得template   return HtmlService.createTemplateFromFile("template-name").evaluate(); 在template-name.html裏面可以穿插呼叫的程式碼,以 <? 起頭, ?> 結尾;如果要輸出值則是 <?= 起頭, ?> 結尾。通常template只有call函數的會使用這個,不然都會寫成下面的作法。 返回有帶參數得template   var template = HtmlService.createTemplateFromFile("template-name");   template.you_defined_var = 'value1';   template.you_defined_var2 = 'value2';   return template.evaluate(); 這樣在template-name.html內就可以用you_defined_var和you_defined_var2這兩個變數。 返回JSON   var your_json = { 'key1' : 'value1' };   return ContentService.createTextOutput(JSON.stringify(your_json))                      .setMimeType(ContentService.MimeType.JSON); 這個最常做的就是下面取得sheet的資料 返回整個sheet的資料JSON格式   var sheet = SpreadsheetApp.openById(SpreadsheetID).getSheetByName(SheetName);   var da

測試AppsScript使用的python程式

這裡感謝Taylor提供的幫助 python 3.5.2 版本 程式碼如下: #!/usr/bin/python3 # -*- encoding: utf-8 -*- try:     # for python 3.5.2     import urllib.parse     import urllib.request except AttributeError:     import urllib query_method = 0 test_url = "你的測試URL" param_obj = {     "m":"123456", } if 0 == query_method:     # POST method     form_data = urllib.parse.urlencode(param_obj).encode('utf-8')     req = urllib.request.Request(test_url, form_data)     print('query url:', test_url)     with urllib.request.urlopen(req) as f:         status = f.status         resp = f.read().decode('utf-8') elif 1 == query_method:     # GET method     params = urllib.parse.urlencode(param_obj)     req_url = "%s?%s" % (test_url, params)     print('query url:', req_url)     with urllib.request.urlopen(req_url) as f:         status = f.status         resp = f.read().decode('utf-8') else:     raise Exception(&

AppsScript:測試並自我Query的方法

下面填入你的網址就能query了 var test_url = {你的測試網址}; var param_obj = {   'm': 123456, }; function json2urlparams_(json) {      return Object.keys(json).map(         function(key) {              return encodeURIComponent(key) + '=' +                     encodeURIComponent(json[key]);      }).join('&');  } function test_post() {     var resp = UrlFetchApp.fetch(test_url, {       'method' : 'post',       'payload' : json2urlparams_(param_obj)     });     Logger.log('status:', resp.getResponseCode());     Logger.log('response:', resp.getContentText()); } function test_get() {     var url = test_url + '?' + json2urlparams_(param_obj);     var resp = UrlFetchApp.fetch(url);     Logger.log('status:', resp.getResponseCode());     Logger.log('response:', resp.getContentText()); }

Ubuntu 16.04 NTP伺服器設置

圖片
參考 Ubuntu 16.04 上的時間同步 https://blog.burn-i.com/20170905/sync-time-on-ubuntu-16-04/ 鳥哥 第十五章、時間伺服器: NTP 伺服器 http://linux.vbird.org/linux_server/0440ntp.php 0. 關閉內建TimeSync服務 請將Time & Date中的Set the time設置成Manually 可使用指令關閉 $ sudo timedatectl set-ntp false 確認已關閉 $ timedatectl ... Network time on: no ... 1. 安裝NTP伺服器 $ sudo apt install ntp 2. 設定NTP伺服器 改設定 $ sudo vim /etc/ntp.conf 加入 server time.google.com prefer  iburst 後面加上prefer是當作主要ntp server 後面加上iburst說是可以加速,一次打8包校時封包 察看還有哪些設定可用 $ man ntp.conf Google public NTP server https://developers.google.com/time 3. 套用NTP伺服器設定 重啟NTP伺服器 $ sudo  systemctl restart ntp 4. 檢驗NTP伺服器 確認服務已啟動 $ systemctl status ntp 會包含啟動log 確認Process是否存在 $ ps auxww | grep '[n]tp' 確認伺服器是否已監聽port 123 $ sudo netstat -nlp | grep ntp 確認系統防火牆 $ sudo ufw status  # 桌面版預設是沒開(inactive) $ sudo ufw allow 123/udp 5. 檢驗設定 5.1 查看目前的peer $ ntpq -p 如果顯示No association ID's returned表示沒有sync的設定 st是階層(st

筆記:建立FB粉絲團Messanger的BOT

參考 FB Messenger Bot 建置教學 聊天機器人 try try 抗之 Facebook Messenger Bot 特輯 流程簡記 啟用FB的developer帳號 https://developers.facebook.com/ 新增應用程式 新增產品>Messanger FB developer主控台>產品>Messanger>設定>存取權杖>創建粉絲團>產生權杖(PageAccessToken) FB developer主控台>設定>基本資料>應用程式密鑰(SecretKey) 下載官方範例,將node資料夾拷貝出來當作自己的BOT專案 https://github.com/fbsamples/messenger-platform-samples.git 修改node底下的config/default.json檔案內容,填入前面的權杖和密鑰,validationToken是你自訂的驗證權杖,和你預計放上BOT的server的網址。以我來說,BOT是放上heroku取名miro-fb-bot專案的話,server URL就是填上https://miro-fb-bot.herokuapp.com/ 將BOT專案佈屬到server上 回到FB developer主控台>產品>Messanger>設定>Webhooks>將你的server URL/webhook填入回呼網址(以我的BOT為例是填入https://mirochiu-fb-bot.herokuapp.com/ webhook ),和你剛自訂的驗證權杖,進行測試 驗證webhooks後,下面webhook至少要選擇訂閱"messages"欄位 開FB,到你剛創建的紛絲團頁面,按"分享"按鈕旁邊的選項>以粉絲團訪客的角度檢視,這時FB就會自動叫出BOT在右下角,隨意輸入文字就會看到返回相同文字訊息

PYTHON小程式:收Multicast/IGMP封包存到檔案

接收Multicast/IGMP封包到檔案 ref: https://pymotw.com/2/socket/multicast.html

python3.5版設定request的不會顯示debug log的解法

有人問為何3.4版就可以顯示http request的log import http.client http.client.HTTPConnection.debuglevel = 1 從 這裡 看起來是設定debug level有問題,實測3.5版,3.6版都有受影響 平常 import urllib. request import http.client http.client.HTTPSConnection.debuglevel = 1 response = urllib.request.urlopen('https://www.google.com') print('status:', response .status) 解法 import urllib. request handler = urllib.request.HTTPSHandler(debuglevel=1) opener = urllib.request.build_opener(handler) response = opener.open('https://www.google.com') print('status:',response.status) 參考: https://stackoverflow.com/questions/42876579

針對requests套件強迫使用IPv4

參考 stackoverflow 和urllib3的原始碼改寫的結果

BASH新增一行字到檔案

新增文字到檔案第2行 $ sed '2i # -coding=utf-8' -i runpy.py

(資訊過時已廢棄)Google App Script踩雷

圖片
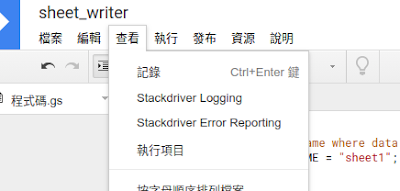
(本篇資訊過時已廢棄) 初用Google app script可以參考這篇 https://www.oxxostudio.tw/articles/201805/backend-apps-script.html 雷點1. 編輯器執行後不會跑輸出給你看 按下編輯器內的"執行",並不會接著跑log或執行結果給你看... 雷點2. 看執行結果的LOG名詞也太多種 我結論就是看log就是找stackdriver 如果只是要看編輯器跑的log,就選"紀錄 (Ctrl+Enter)" 如果你要看其他的log,就選"執行項目"。(也是跳到stackdriver) 雷點3. 看log(Stackdriver)要注意執行身份/條件 Stackdriver有區分執行者的,預設從編輯器跳過去都是預設"執行身份"為"自己" 你如果用其他工具測試,如curl/wget/API tester,就需要把左上角的"執行身份"改成"所有人" 雷點3.1. 直接從開發console要看你的WebApp的LOG的路徑很長 左方選單:"我的專案">選{你的專案名稱}>出現圖表後,點右邊的"專案詳細資料"的"...">執行項目 左方選單:"我的執行項目",選擇執行,也不會列出從python或一些工具發出的request。 雷點4. 不同工具發出的request不見得全部都可以在stackdriver中展開內容 我使用python的request就是只會出現紀錄,但是無法展開內容,明明script都沒改阿! (我個人覺得這應該是stackdrive的bug) 一個python的簡單測試程式, 請取代紅色部份文字 #!/usr/bin/python import requests in_url= 'https://script.google.com/macros/s/......' obj = { "from": "python",

筆記:Python的requests除錯

1.察看某python模組版本號 https://stackoverflow.com/questions/20180543 以requests模組為例 在BASH $ pip freeze | grep requests requests==2.23.0 在python shell >>> import requests >>> print(requests.__version__) 2.23.0 2. 顯示Request的詳細資訊 https://blog.anank.ke/w/Enable-Debug-Mode-for-Requests 加入程式碼 import logging try:     from http.client import HTTPConnection except ImportError:     from httplib import HTTPConnection HTTPConnection.debuglevel = 1 logging.basicConfig() logging.getLogger().setLevel(logging.DEBUG) requests_log = logging.getLogger("requests.packages.urllib3") requests_log.setLevel(logging.DEBUG) requests_log.propagate = True 執行時在螢幕上可看到 送出的request在 send: 'POST /..... server回覆的http response reply: 'HTTP/1.1 XXX ..... 回覆的header header: Content-Type: .... 其實requests的回覆也可以在程式中取得 resp = requests.get(in_url) print ('URL:',      resp.url) print ('status:',   resp.status_code) print ('headers:',